How to Sew a Custom-Stitched Card and Envelope
Sewing isn’t just for fabric! Create a truly special stitched card and envelope with these techniques for using a sewing machine to sketch on cardstock or paper.
A whole world of sewing opens up when you master drawing with thread. We like to use a sharp pencil, chalk, or vanishing ink pen to sketch some guidelines on the surface before stitching. Come up with your own motifs, use templates, or just improvise and design as you sew.
Sketching with Thread
How to do it: Different line styles call for different approaches.
Outlines: When stitching the drawing’s main lines, sew slowly. Manipulate the fabric gently to negotiate curves. Stop often, checking your needle placement. At the point where lines intersect, stop sewing with the needle down, lift the presser foot, and turn the fabric, making sure that the stitches are always going forward to keep the lines clean and sharp. For bolder outlines, sew over the same lines two or three times. As a general rule, set your presser foot pressure to 2 for stitching gradual curves or right angles where you will stop and lift the foot to turn the fabric.
This medium pressure helps keep the lines looking tidy but makes it easier to move the fabric. If the lines are small and tightly spaced, then decreasing the pressure to 0 or 1 would be better, giving you more control of the fabric.
Scribbly areas: Set your presser foot pressure to 0 (we set our stitch length at 2). Get a good grip on the fabric on either side of the presser foot. Increase your stitching speed so you’re sewing quite fast, and manipulate the fabric by pulling it where you want the stitches to go, in tiny circles as in the pupils of a bird’s eye, or back and forth for zigzagging scribbles as in a monster’s hair. You can also use this technique to fill a shape with color.
Sewing on Paper or Cardboard
Stitching on paper or cardboard is simple and lets you get wildly creative, but keep in mind that each time the needle perforates the material, it compromises the surface. If too many stitches are made in one small space, paper can tear. For this reason, it’s easiest to use thick, high-quality paper or cardstock. Cardboard should be single-ply (steer clear of the corrugated stuff).
How to do it: After experimenting to find the proper settings, sew decorative lines using the Sketching with Thread technique described above. Keep your material moving, never letting the needle stay in one spot for more than a stitch or two.
You don’t need an industrial machine to stitch through unconventional materials like plastic, paper, and cork. A basic home machine can easily handle these and many others, as long as the material fits under the presser foot and the needle can pierce it.
Universal needles work for this project. Before beginning, experiment with your machine’s settings, working on scraps of your project material to find the right stitch length and width, thread tension, and foot pressure. If you are running into trouble, you may want to use a specialty needle. To determine the right needle type and size, refer to your machine’s manual and talk to a knowledgeable sewing machine salesperson.
Custom-Stitched Card and Envelope

Once you’ve embellished paper with thread, you may never go back to pen and pencil! And one great plus: with paper, the stakes are delightfully low, so you can play around with different techniques and stitches until you get a feel for them. This project makes a beautiful keepsake for birthdays, holidays, or any time at all.
What You’ll Need
- Cardstock
- 1 or more spools of contrasting thread
Step 1: Measure, mark, and cut
From the cardstock, measure, mark, and cut the following pieces:
- card: 5½” x 11″
- envelope: 6½” x 11″
- flap: 6½” x 2″
Step 2: Make the card
Fold the card in half so the short edges align. With a sharp pencil, lightly draw a simple design and lettering on the front of the card. With a straight stitch (our stitch length was 2.5), sew over your guidelines using the Sketching with Thread technique (from the beginning of this article). Sew straight lines with full presser-foot pressure, and sew curved ones with decreased pressure.
Step 3: Make the envelope
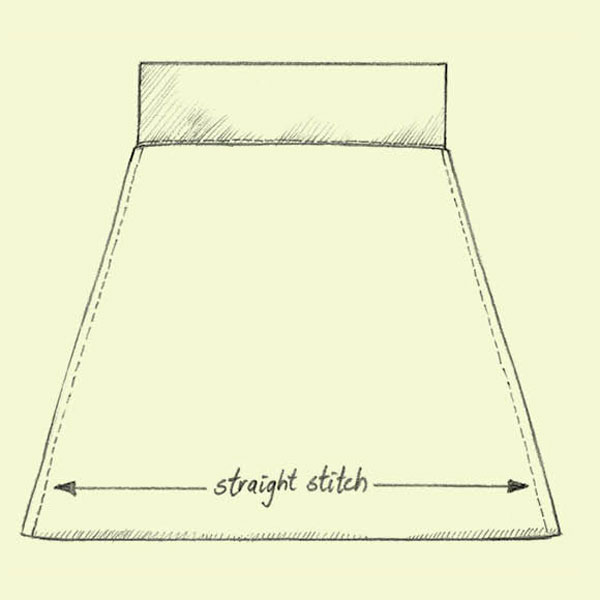
Align the 6½” edges of the flap and envelope so that the flap overlaps the envelope by ¼”. Zigzag the overlapped edges (our stitch length was 2); backstitch at both ends to secure. Fold the opposite edge of the envelope up to meet the seam. With a straight stitch, sew the envelope sides closed with a scant ¼” seam, backstitching at both ends.
TEXT AND PROJECT EXCERPTED FROM IMPROV SEWING © NICOLE BLUM AND DEBRA IMMERGUT.


Related Books
-
The Sewing Answer Book
-

Sew What! Bags
-
Skirt-a-Day Sewing