Outdoor Fun in a Jar: Science Activities for Kids
Get kids outdoors and exploring the natural world with three delightfully dirty projects from Mason Jar Science.
How can you get your screen-loving kids interested in the outdoors? Try giving them a new hand-held device: an old-fashioned mason jar.
Okay, so it’s not exactly an iPad. But a mason jar, combined with a few other materials and some creative hacking, can still provide hours of entertainment, and with any luck your kids will get to experience the satisfaction of scientific discovery. At the very least, these jar-based science activities from my book, Mason Jar Science, will get them to turn off their screens, which now occupy on average more than seven hours of a typical kid’s day. The key to breaking this digital stranglehold is enlisting aspects of the natural world that have irresistible kid-appeal. You know the stuff: slimy worms, creepy bugs, and piles of dirt and mud. The following three projects offer exactly this type of delightful diversion.
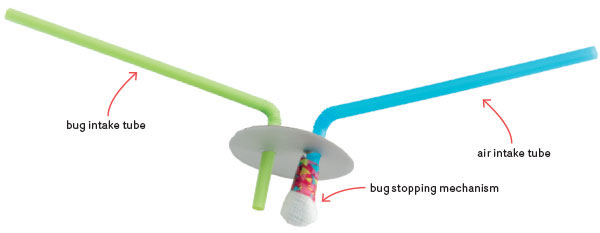
Make a Bug Vacuum
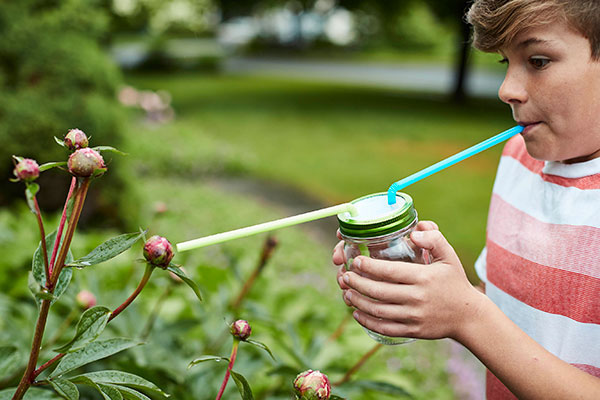
Capture insects with ease! Scientists capture bugs for study using a mouth-powered vacuum, called an aspirator or a pooter. Swallowing your specimens isn’t good science, so this device is specially designed so bugs are sucked into the chamber, not into your mouth! Kids can make their own version from a mason jar, then use it to gather ants (or other small insects) and observe them in action.
What You’ll Need
- Pint-size mason jar with two-piece lid
- Milk or juice carton
- Hole punch
- 2 bendy straws
- Tape
- Gauze pad
Directions
- Open the milk carton along the seams and flatten it out. Use the inner lid of the mason jar as a template to trace a circle on the carton. Cut out the circle and punch two holes in the center about an inch apart.
- Carefully slide the short ends of the bendy straws into the holes. Tape a piece of gauze pad around the end of one straw to prevent any bugs from getting sucked up.
- Set the lid on the jar and fasten it in place with the ring.
- To use your pooter, place the tip of the straw without the gauze near a bug. Put your mouth on the straw with the gauze, and gently suck in. The bug should travel up the straw and land unharmed at the bottom of the jar.
Take It Further
Capture some ants in your bug vacuum, then use a magnifying glass to observe these remarkable insects up close. Open the jar and feed them a few drops of sugary water or corn syrup, or try giving them some birdseed. Ants live in colonies headed by a queen ant, and they can’t last long on their own. When you are done observing them, release your ants where you found them. (Note: Some ants bite, so be careful handling them.)
Build a Worm Composter
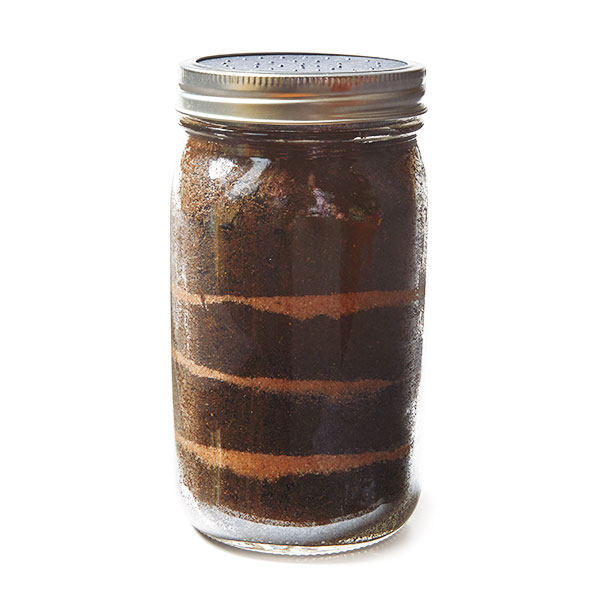
Watch worms turn food scraps into soil! Sure, they may look all soft and noodle-like, but earthworms are hard-working, earth-moving, soil-improving dynamos, capable of transforming rotten plants into rich garden soil. This composting jar lets kids see them in action. The inner container forces the worms to tunnel close to the outer jar’s side, and the layers of sand let you measure just how much they have accomplished.
What You’ll Need
- Wide-mouth quart- size mason jar with two-piece lid
- 12-ounce jar, aluminum can, or other narrow container that fits inside the quart jar
- ¾ to 1 cup garden soil
- ½ cup light sandy soil
- Stiff paper and pushpin
- Construction paper and tape
- Chopped veggie scraps for food
- Water
Directions
- Set the smaller container upside down inside the larger jar. This forces the worms to tunnel near the outer glass, where you can observe them.
- Add a few spoonfuls of garden soil to the jar, pouring it evenly around the sides so it fills in the space between the two jars and creates a layer about an inch deep. If the soil is not moist, add a little water.
- Add a thin layer of sandy soil, then another 1-inch layer of garden soil, then a thin layer of sandy soil, and so on, until you’ve nearly filled the jar, topping it with darker garden soil. The thin layers of sandy soil will allow you to see how the tunneling worms mix soils together.
- To make a perforated cover for the jar, use the inner lid to trace a circle on the paper. Cut it out and poke several dozen holes in it with the pushpin. Set it inside the screw-on ring in place of the inner lid.
- Gather your earthworms. Dig in a garden bed or in your compost pile, or look under rotting logs or piles of leaves (worms need dark, moist living conditions). An even easier way is to go out after a rainstorm and rescue worms from the sidewalk!
- Place about six worms in the jar and add some chopped veggie scraps for food, setting the scraps on top of the soil. Screw on the cover.
- Wrap the jar with the construction paper and secure it with tape. This keeps the worms in the dark, where they like to be. Place the jar in a cool place, out of the sun (if you have one, a basement is ideal).
- Sprinkle the surface with water every few days to keep everything moist. Slide off the paper wrapping after a day or two to see what the worms have done.
What to Watch For
Earthworms play a key role in the ecosystem of the soil. By eating food on the surface, bringing it into the soil, and producing poop (called castings), they make the soil more fertile for plants. Their tunneling mixes the soil and allows in air and water, which also helps plants. You should be able to see the effects of their tunneling after a few days. Notice the changes in the layers of lighter and darker soils, and how food that was once on the surface is now gone.
Grow a Jar-rarium
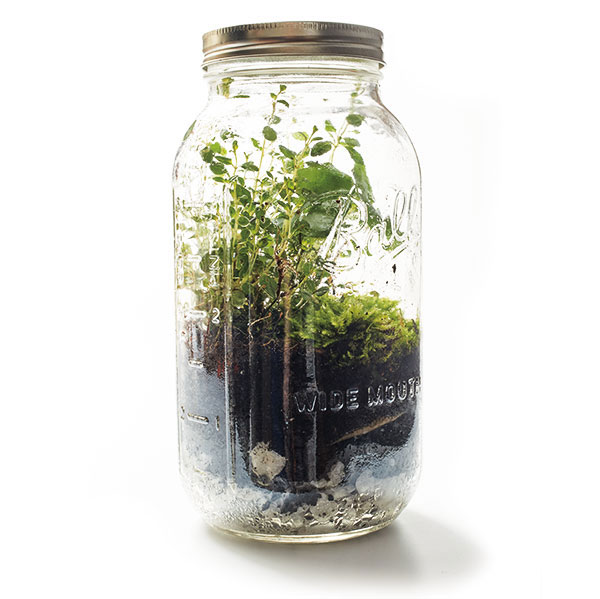
Create a living garden inside a jar! This terrarium in a jar is a world of plants and soil sealed up in glass. There is one thing, however, that has to enter this world regularly, and without it, nothing would live: light. Fortunately, the clear glass lets the sunshine in, and from that, the plants can make the food they need to survive. Keep your “jar-rarium” near a window where it gets just enough light (but not too much), and it can last for years.
What You’ll Need
- Wide-mouth quart-size (or larger) mason jar with two-piece lid
- Pebbles
- Large spoon
- Activated charcoal (sold at pet stores)
- Coffee filter
- Scissors
- Potting mix
- Spray mister filled with water
- Paper towel
- Moss and other low-growing woodland plants that will fit in the jar
- Stones and other decorations
- Fork or other long-handled tool
Directions
- Before you go out to gather plants, collect all the other materials you’ll need and put them in your workspace.
- Collect your plants. Wild plants that grow well in terrariums are usually found in shaded, wooded areas with moist soil. Look for mosses, small ferns, and low-growing ground covers like violets (but watch out for poison ivy!). Only dig where you have permission. Using a garden trowel or a large spoon, dig around the plant’s roots, keeping as much soil attached as you can. Put the plants in a small plastic bag or tub and keep the roots damp and protected from sunlight until you get home. You can also buy small plants at your local garden center or nursery.
- Cover the bottom of the jar with an inch or so of pebbles. This creates an area where excess water can drain.
- Spoon a half-inch layer of activated charcoal on top of the pebbles.
- Using the jar lid as a template, cut a circle from the coffee filter that is a little smaller than the diameter of the jar. Lay it over the charcoal. This prevents soil from mixing with the pebbles and charcoal, keeping the drainage area clear.
- Carefully spoon in about 2 inches of potting mix, or enough to fill the jar one-third of the way. Mist the soil with the sprayer until thoroughly dampened, but not soggy.
- If needed, lightly trim the roots and branches so the plants fit in the jar. Working with a fork or other long- handled tool, dig into the soil and press the moss and plants into place. Add any other decorations.
- Mist the plants lightly, taking care to moisten the soil near the plants’ roots (without flooding them out!). Use a paper towel to carefully wipe the inside walls of the jar. Screw on the two-piece cap and place the jar in a bright place, but not directly in the sun.
What to Watch For
Observe the jar-rarium closely over the next few days. If the sides get cloudy or completely covered with water drops, take off the cap for an hour or so to let the water evaporate (a little water on the sides is normal). If the soil starts to look dry, give it a little more misting. If plants turn yellow or otherwise look unhappy, or start to die, cut them out and consider replacing them.
What’s Going On
A jar-rarium is what scientists call an ecosystem. Just like on earth, the plants, soil, and water all work in harmony, allowing the system to thrive. The plants draw water up through their roots, then release it through pores (tiny holes) in their leaves, a process called transpiration. The water then collects on the sides of the jar and falls back on the soil, to be reused by the plant.
When plants create food through the process of photosynthesis, they give off oxygen. The oxygen is then used by bacteria in the soil, which break down old plant material such as leaves and give off carbon dioxide. The plants then use the carbon dioxide again, in a repeating cycle that keeps all these living things happy.
Experiment text excerpted from Mason Jar Science © 2018 by Jonathan Adolph. Header illustration by Andy Smith. All rights reserved.
Learn More

Nautilus Book Awards Silver Winner
Heatproof, transparent, and durable, the mason jar is a science lab just waiting to be discovered. Unlock its potential with 40 dynamic experiments for budding scientists ages 8 and up. Using just a jar and a few ordinary household items, children learn to create miniature clouds, tiny tornadoes, small stalactites, and, of course, great goo and super slime! With a little ingenuity, the jar can be converted into a lava lamp, a water prism, a balloon barometer, and a compass. Each fun-packed project offers small-scale ways to illustrate the big-picture principles of chemistry, botany, biology, physics, and more.

Related Reads
Featured Titles
-

Cooking Class
-

Say Cheese!
-

The Nature Connection
-
Backpack Explorer: On the Nature Trail
-

Gardening with Emma