Make Your Own Miso
Miso — the East Asian seasoning made from fermented beans (traditionally soy) — is a flavor- and nutrition-packed paste that needn’t intimidate home cooks.

Miso is more than just soup stock. It is an umami-rich, salty fermented paste, traditionally made with soybeans and a grain koji, generally rice koji or barley koji (with the exception of an all-soybean miso). It is a quintessential Japanese seasoning that is also a nutritional powerhouse. It plays a vital role in the kitchen and in the health of the people who use it. It is both very simple and very complex. If you are new to miso or have only had it as a broth served alongside sushi, we encourage you to find some good-quality unpasteurized miso and start getting to know its many flavors and nuances. That will give you something to enjoy while you wait for your own batches to be ready. And don’t let the time or the making intimidate you; the hands-on portion is quite simple, and the waiting time is actually over before you know it.
Throughout the world, folks are using the ancient knowledge, technique, and art of miso to create savory, umami-rich, complex, and healthful pastes. Fermented bean pastes are a wonderfully complex cooperation of fungi, yeasts, and bacteria that create a fascinating, rich, complex food that is both flavorful and wildly nutritious. As such, fermented bean pastes are an essential source of flavor and nutrition throughout East Asia. More than just condiments, these pastes are a concentrated, inexpensive, shelf-stable source of protein and play a significant role in people’s diets. In short, they are a staple part of traditional cuisines from this region.
History of Miso and Fermented Bean Pastes
Bean pastes are ancient foods made using a wide range of techniques that grew out of the different regions from which they hail. It is generally agreed that the predecessor to all of these pastes, hailing from China, was chiang (jiang), which first came into existence at least 2,500 years ago, give or take. In China today, chiang denotes hundreds of fermented products. They include douchi, which are fermented, salted, and dried black soybeans and hoisin. The hoisin you’ll find on the supermarket shelf is usually an unfermented soy-based sauce with garlic and spices, but its history goes way back. Traditionally it is a fermented product, and it was actually one of the first foods produced using shih (semidry fermented things, primarily soy).
Recipes migrate with people, and so did chiang. It’s said that a Chinese Buddhist priest who came to Japan in the seventh century to promote Buddhism brought chiang along with him. There it came to be called shi. It is believed that at relatively the same time, chiang spread to Korea as well, where it became known as jang.
The creation story of miso is not entirely clear. Since Neolithic times, peoples of East Asia have made fermented grain and fish known now as jōmon miso. But this didn’t necessarily become the forerunner of the miso we know today. It is likely that prior to the eighth century in Japan, miso was made only by Buddhist priests in their temples and consumed by the elite of the country. At the beginning of the eighth century, the emperor of Japan established a bureau to regulate the production, trade, and taxation of miso. Over a century later, miso had made it out of the temples and capital city and into the rest of the country, where over the next centuries it would become very popular with the common people.
As Koreans, Chinese, and Japanese immigrated to other countries, they not only brought their fermented bean pastes with them, they also brought the knowledge of how to prepare them. That knowledge eventually took seed in future generations and spread far outside the family tree.
Health Benefits
Like other foods made from fermented soybeans, miso inherits a number of health benefits from the microorganisms predigesting the legumes. Unique to miso is the fact that there is a whole team of enzymes and microbes — the koji aspergilli, the lactic acid bacteria, the yeasts, and the bacilli — working together, or at least with tolerance for each other, to produce amazing health benefits.
Specifically, miso is high in proteins that have been broken down into amino acids and further into peptides, which our bodies can more easily turn into energy. We should quickly note that despite miso’s high sodium content, rodents in the studies showed stable blood pressure.
Lower cholesterol. We’ve noted that raw soybeans contain saponins, which produce a soaplike froth when you wash them. Well, once we consume them in miso, they continue to act like a washing agent but this time inside our blood vessels, which can become blocked with cholesterol. The saponins are joined by lecithin and linoleic acid, which help dissolve the cholesterol clinging to our blood vessels.
Reduced cancer risk. A daily miso soup reduces your risk of gastric cancer. Also, miso made from fermented soy contains high levels of isoflavones that are known to help in the prevention of breast cancer in women. There have even been a few well-documented studies noting that the consumption of miso mitigates the effects of radiation.
After World War II, Japanese doctor Shinichiro Akizuki spent years caring for atomic bomb victims a few miles from ground zero; however, neither he nor his staff suffered the typical effects of radiation. He postulated that they were protected from the radiation because they drank miso soup every day. Akizuki’s theory was confirmed in 1972 when researchers determined that miso has dipicolonic acid, an alkaloid that combines with heavy metals and expels them from the body. Two decades later, a report published in Japan by Dr. Akihiro Ito described a study of mice that had been exposed to radiation and then fed a diet containing 10 percent miso or soy sauce for 13 months. They found that the female mice on the miso diet experienced a significant decrease in the frequency and number of liver tumors.
More B vitamins. The vitamin B2 content is increased by fermentation, likely from the koji. B12 is also increased, likely from the lactic acid bacteria. B12 is the one vitamin that does not occur in plants, so anyone following a plant-based diet needs to find a source for B12 to avoid deficiency, which can lead to irreversible nerve damage.
Strong bones. Miso contains lysine, which helps our bodies better absorb calcium, and it also contains high levels of magnesium, which helps build strong bone structure.
Traditional medicine views aged miso as having medicinal qualities. It is clear when you smell or taste these misos that they are in an entirely different class from their younger miso cousins and are potent medicine.
Making Miso: An Overview
As you will see, making miso is pretty simple — it’s simple to put together and simple to manage. The most important thing is to keep it weighted and to occasionally stir smaller batches. You can neglect your miso and it will still ferment. And if there is mold on top, just scrape it off.
Start with Koji
Making miso is a two-part process that begins with koji (Aspergillus oryzae). Traditionally, steamed grain (generally rice or barley) or soybeans are inoculated with the koji spores and spread in shallow wooden trays. The trays are kept in a humid, warm environment (we are growing mold, after all) for 40 to 48 hours. During this time the fungus blooms and binds the substrate together.
The beauty of making miso is that you can make your own koji (complete instructions for this can be found in our book) or you can purchase koji and get started. Once you have made or purchased the koji, the rest of the process is quite simple and quick (the active part at least). When you read through these step-by-step instructions, we think you will agree. If you are daunted by the thought of making your own koji, don’t let that stop you from discovering the joy of making your own miso. We encourage you to dive into the vat and make miso with purchased koji. This process is the same no matter what ingredients you choose.
Using Precultured Koji in Miso
If you are not using homemade, wet koji, you can use precultured dry koji. Simply premoisten the koji with some of the bean pot liquor (cooled to below 135°F/57°C). You will use about 10 percent of the weight of the dry koji in the added liquid. Add about a tablespoon at a time, letting the water absorb for a few minutes before adding another tablespoon. The koji should be just hydrated, not wet. Allow at least 30 minutes for the moisture to penetrate the koji grains.
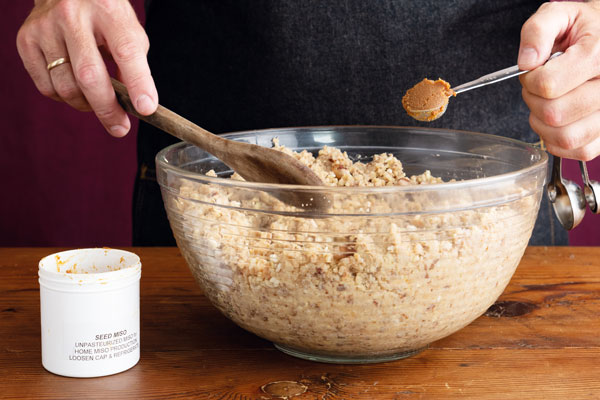
Seed Miso
Once the koji is hydrated, you will mix it with cooked soybeans, some of the bean cooking liquid, salt, and some unpasteurized finished miso, often called seed miso. The seed miso isn’t entirely necessary, but it will introduce the unique bacteria and yeasts that not only jump-start the process, which shortens the wait time, but also ensure that the flavor is repeated from batch to batch. In Japan, where miso shops have been making miso in the same place for centuries, the barrels, the walls, and that small bit of seed miso pass on the heritage of each shop’s unique flavor.
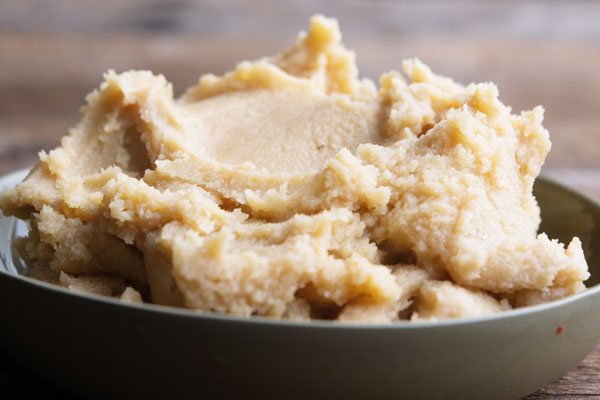
Sweet White Miso
White misos are the gateway misos. Sweet and gentle, they are easy to love and easy to eat; we found that we wanted to put white miso in all of our recipes. This basic recipe is similar to a type of sweet miso that is traditionally made in Kyoto, Japan. It is like a soft cheese — delicious, delicate, and not as shelf stable as some of its cousins. This miso has a high concentration of koji rice, the least amount of soy, and a low-salt brine, and during fermentation it becomes almost custardlike. Use this recipe as written or use it as a template for your own sweet miso. We have made a delicious white miso with white tepary beans and Carolina Gold rice for an heirloom, born-in-the-Americas version.
Yield: About 1 Quart
Ingredients
- 1 cup (175 g) dry soybeans
- 3½ cups (600 g) light Rice Koji
- 2½ tablespoons (42 g) salt, plus extra to prep the vessel and top the miso
- 1 tablespoon (16 g) unpasteurized miso [Note: Any unpasteurized miso will work, but we prefer to use white if it is available.]
Directions
Soak the beans for 8 to 24 hours. If you’re making your own koji, time the soaking with the koji cycle; you will want your beans to be cooked when your koji is ready to come out of the tray.
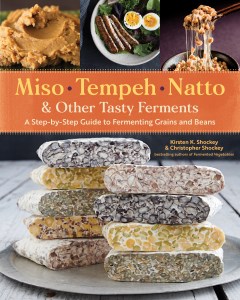
Excerpted from Miso, Tempeh, Natto & Other Tasty Ferments © Kirsten Shockey And Christopher Shockey
2019 Foreword INDIES Winner
Best-selling fermentation authors Kirsten and Christopher Shockey explore a whole new realm of probiotic superfoods with Miso, Tempeh, Natto & Other Tasty Ferments. This in-depth handbook offers accessible, step-by-step techniques for fermenting beans and grains in the home kitchen. The Shockeys expand beyond the basic components of traditionally Asian protein-rich ferments to include not only soybeans and wheat, but also chickpeas, black-eyed peas, lentils, barley, sorghum, millet, quinoa, and oats. Their ferments feature creative combinations such as ancient grains tempeh, hazelnut–cocoa nib tempeh, millet koji, sea island red pea miso, and heirloom cranberry bean miso. Once the ferments are mastered, there are more than 50 additional recipes for using them in condiments, dishes, and desserts including natto polenta, Thai marinated tempeh, and chocolate miso babka. For enthusiasts enthralled by the flavor possibilities and the health benefits of fermenting, this book opens up a new world of possibilities.


Related Books
-

Fermented Vegetables
-

Fiery Ferments
-

Homebrewed Vinegar
-

The Big Book of Cidermaking
-

Our Fermented Lives


