Craft Project: Cutting and Using Stamps
Anything you can spread paint on can be used as a stamp for printing fabric.
Finding your own unique stamps is as easy as opening your kitchen drawer. You can carve stamps out of wood, linoleum, erasers, and potatoes. You can also fashion them with sponges, weather stripping, craft foam, disposable foam food trays, and yarn. The possibilities are really endless.
As you develop your designs and ferret out sources of inspiration, don’t underestimate the visual power of very simple shapes and forms.
Using Your Custom Stamps
Try to stretch your imagination by reminding yourself that there is no right or wrong way to do most of the techniques I describe in my book, including stamping. As I tell all my students, my role is to help you go beyond your own visual comfort level. Be brave. Have the creative courage to do the unexpected. If you think what you’ve done is just horrible in the end, you can always throw it away — although I would encourage you to save even your mistakes, because a certain aspect of any one of them may be just the thing you need for a future art piece. I like to think of each piece I do as visual inventory. If collage is your love, these saved pieces will enable you to create a fiber collage sometime in the future using only your own imagery and elements you’ve created. If you are a beginner, keep in mind that you will learn far more from your mistakes than from your successes.
Paints
When you choose your paints for stamping, remember that unless you use opaque paints the paint colors you already have on your fabric will show through the stamped image. This greatly adds to your goal of visual dimension.
If you’ve carved very detailed images on a soft linoleum block, you will have to use ink from an ink pad rather than paint, because even a light application of paint would more than likely fill in the negative spaces of your stamp. I recommend VersaCraft ink pads made by Tsukineko, which can be heat set on fabric for permanence.
Work Surface
Stamping needs to be done on a flat surface with a bit of give to it. It can’t be done on stretched and suspended fabric. If you haven’t made a padded work surface, you can work over a bath towel folded in half, a scrap piece of polar fleece, or a small stack of newspapers covered with plastic sheeting.
Prewashed Fabric
Before painting on your fabric, you should always prewash it in hot water with a product called Synthrapol (available at some fabric stores and online art suppliers) or a detergent that is free of any scents or fabric softeners.
Heat Setting
Once painted, most of your fabrics will need to be heat set. If you use acrylic paints, follow the manufacturer’s directions. Heat set textile paints by ironing the fabric with a dry iron or by putting it in a clothes dryer set on high for 30 to 45 minutes. (Don’t do this until the paint is dry!)
Protect your ironing board cover by placing a piece of parchment paper between the fabric and the ironing board. You may wish to use protective paper on top of the fabric as well.
Caring for Your Stamps
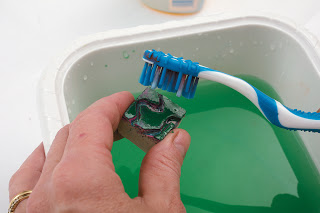
If you take good care of your handmade stamps, they will serve you well for a very long time. Try not to allow paint to dry on stamps; wet paint is easier to wash off than dry paint, and textile and artist acrylic paints tend to dry pretty quickly. When you finish making impressions with your stamp, wash the paint off as soon as possible. Using an old toothbrush and some soap, gently scrub away the paint.
A Word about Commercial Stamps
Commercial stamps are very tempting to use, but because they are designed for use on relatively small sheets of paper, the overall scale of the imagery is usually small. Also, the depth of a stamp intended for use on paper is much shallower than the ideal depth of a stamp meant for printing on fabric. And although commercial stamps are licensed for personal use, it’s possible that there could be copyright infringement if you were to sell an art piece that incorporates the use of these stamps.
Cutting and Printing a Linoleum Block Stamp
Supplies Needed for Stamp Cutting
- Paper (same size as block) and pencil
- Blank soft linoleum block
- Spoon, bone folder (a tool used in making books), or scoring tool (used in scrapbooking)
- Set of linoleum block cutters
Supplies Needed for Printing
- Padded work surface covered with plastic sheeting
- Foam brushes or any flat brush measuring about 2″ wide (or larger for big stamps)
- Medium- or heavy-body textile paints, or artist acrylic paints and the appropriate textile medium
- Stamp
- Prewashed fabric (see above)
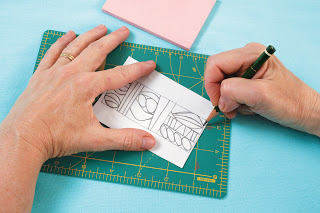
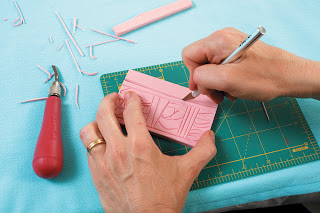
Step 1: Cutting a Linoleum Block Stamp: Draw your design on a piece of paper the size of your linoleum block. (You can also trace around the block, then draw your design within the space.)
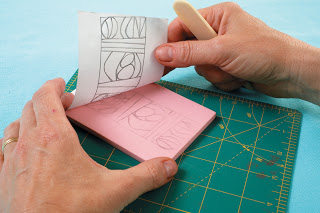
Step 2: Transfer the design by laying the paper drawing side down on the block and burnishing (rubbing) the back of the paper with the edge of a spoon, a bone folder, or a scoring tool. (If you made your drawing with a soft pencil, you can simply use your finger to burnish the design.)
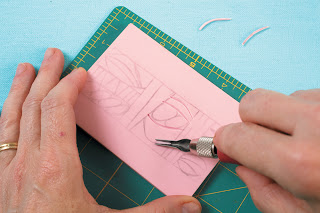
Step 3: Choose the linoleum cutting blade that best fits the negatives spaces of your design, and begin to carve. (You might want to practice a bit first on an eraser that’s a bit smaller than your block.)
Step 4: When you are finished carving around the central design, cut away the material on the outside edges of the block adjacent to your design. This will help you see exactly where to place the stamp on your fabric.
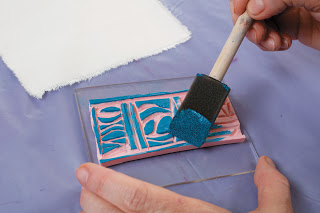
Step 5: Printing Your Stamp: Dip your brush lightly into the paint, and brush it across your stamp. Use enough paint to make a clean image, but not so much that the paint fills in the negative spaces or squishes out the sides as you print.
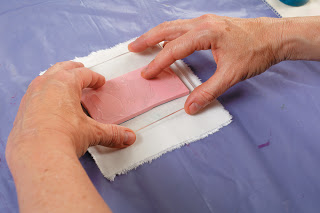
Step 6: Press the stamp onto your fabric. Take care to put pressure around the edges of the stamp as well as in the center. This is especially important if your stamp is large. Rock the stamp back and forth from edge to edge without actually lifting the edges up.

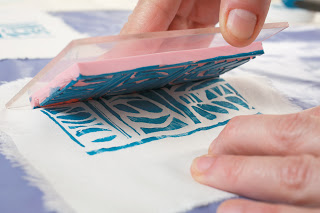
Step 7: If the stamp is small, lift it straight up and off the fabric. When working with larger stamps, lift one side first, as if it had a hinge, then lift the whole stamp up and off the fabric.
Step 8: Set the fabric aside to dry completely. Heat set if necessary (see above).

Related Books
-

Fabric-by-Fabric One-Yard Wonders
