Charred Eggplant Dip and Skillet Flatbread

Change up your regular appetizer routine with this flavorful alternative to chips and dip that can be fully prepared in a cast-iron skillet.

Charred Eggplant Dip

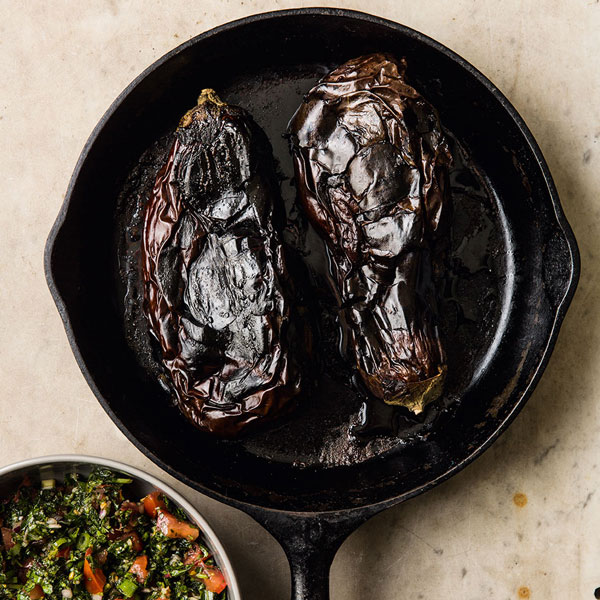
Charred Eggplant Dip, or salata de vinete (which you have to say quickly and as all one word to fit in at my house), has been made by my family for almost every occasion for as long as anyone can remember. It goes great with everything from crackers to cold pasta, but I especially love it with these lightly-puffed skillet flatbreads.

Flatbreads are so simple that once you’ve mastered them, they are a delightful way to play with heirloom flours. They are also super-fun to make over a campfire. Have the dough ready and place a pan on a rack over a low fire or on a cooler spot on your grill. The cooking time remains the same.


Charred Eggplant Dip

Makes about 2 cups

Ingredients

  • 2 large eggplants
  • ¼ cup olive oil
  • 1 tablespoon red wine vinegar
  • 3 garlic cloves, minced
  • ¼ cup minced red onion
  • 2 tomatoes, diced
  • 1 cup finely chopped fresh basil
  • 1 cup finely chopped fresh mint
  • 1 scallion, thinly sliced
  • Salt and freshly ground black pepper

Directions

  1. Char the eggplants over an open flame or under the broiler, turning frequently, until they are blackened in spots, about 5 minutes.
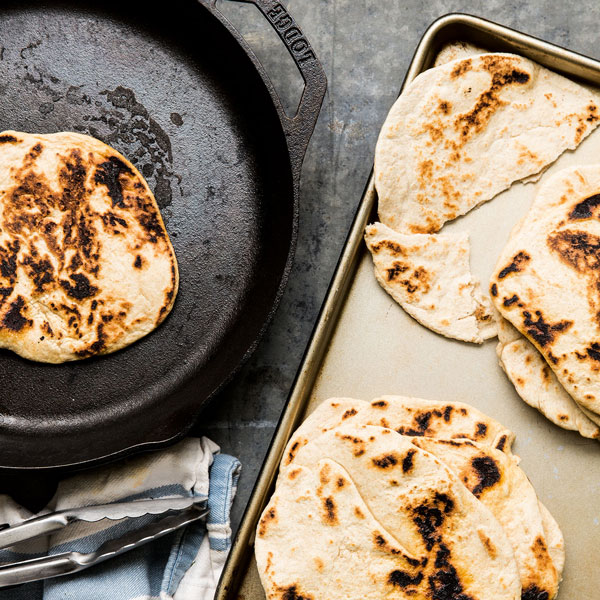
  2. Preheat the oven to 350°F/175°C.
  3. Arrange the eggplants in a 12-inch cast-iron skillet. Place in the oven and cook for about 20 minutes, until soft. Allow to cool.
  4. Scrape out the eggplant flesh and add to a food processor. Pulse until smooth. Transfer to a bowl and fold in the oil, vinegar, garlic, red onion, tomatoes, basil, mint, and scallion. Season to taste with salt and pepper. Let rest, refrigerated, for 1 hour before serving.

Charred eggplant Dip Skillet Flatbread

Flatbreads

Makes 12 flatbreads

Ingredients

  • ½ cup warm water
  • 1 packet (2¼ teaspoons) active dry yeast
  • 2½ cups all-purpose flour
  • ½ cup whole-wheat flour
  • 1 teaspoon salt

Directions

  1. Pour the warm water into a small bowl. Sprinkle the yeast on top and let rest for 2 minutes, until the yeast foams.
  2. Add the all-purpose flour, whole-wheat flour, and salt to the bowl of a stand mixer. With the mixer on low, add the water slowly, until a smooth ball of dough forms. It should not be sticky. This can take up to 8 minutes. You may not need all the water, or you may require a bit more.
  3. Place the ball of dough in a lightly oiled bowl, cover with a clean cloth, and let rise for 1 hour.
  4. Remove the dough from the oiled bowl and knead briefly by hand, then divide into 12 equal-size balls. Roll out each ball of dough to a diameter of 6 inches and ¹/₁₆ inch thick.
  5. Heat a dry 12-inch cast-iron skillet over high heat. Add one disk of dough and cook until lightly browned on the bottom, about 2 minutes, depending on thickness. Use tongs to turn the dough and cook for 1 minute longer. Repeat with all the dough.
  6. Serve warm or store in an airtight container for up to 2 days.

EXCERPTED FROM CAST-IRON COOKING © RACHAEL NARINS. PHOTOS © KELLER + KELLER PHOTOGRAPHY.


Rachael Narins

Rachael Narins

About the Author

Rachael Narins, author of Cast-Iron Cooking, is a chef, culinary educator, and food writer based in Santa Monica. She is a graduate of the California Culinary Academy,  a regular contributor to the L.A. Weekly food section, and has written about food preservation for the Los Angeles Times. Her work has also appeared in Organic Gardening Magazine, Bust, Edible Westside and more. In 2008, Narins founded Chicks with Knives, a culinary event company. During the summer of 2014, she served as the VIP culinary judge on an episode of Kitchen Kickstarter on NBC, and is currently the Cast Iron Expert on Feed Feed.

Learn more about this author

Related Books